SOME OF THE MOST IMPORTANT ANDROID SETTINGS ARE ALSO THE MOST BURIED — AND THEY’RE ABSOLUTELY WORTH YOUR WHILE TO UNCOVER AND PUT INTO ACTION.
You might not know it from all the panic-inducing headlines out there, but Android is actually packed with practical and powerful security options. Some are activated by default and protecting you whether you realize it or not, while others are more out of the way but equally deserving of your attention.
So stop wasting your time worrying about the Android malware monster du jour and which security company is using it to scare you into an unnecessary subscription, and take a moment instead to look through these far more impactful Android settings — ranging from core system-level elements to some more advanced and easily overlooked options.
Ready? Ready. Let’s do this:
From our partners:
ANDROID SETTING NO. 1: APP PERMISSIONS
A rarely spoken reality of Android security is that your own negligence — either in failing to properly secure your device in some way or in leaving open too many windows that allow third-party apps access to your info — is far more likely to be problematic than any manner of malware or scary-sounding boogeyman.
So let’s address the first part of that right off the bat, shall we? Despite what some sensational stories might lead you to believe, Android apps are never able to access your personal data or any part of your phone unless you explicitly give ’em the go-ahead to do so. And while you can’t undo anything that’s already happened (unless you happen to own a time-travelling DeLorean — in which case, great Scott, drop me a line), you can go back and revisit all your app permissions to make sure everything’s in tip-top shape for the future.
That’s advisable to do periodically, anyway, and particularly now — as the last few Android versions have included some important new app permission options.
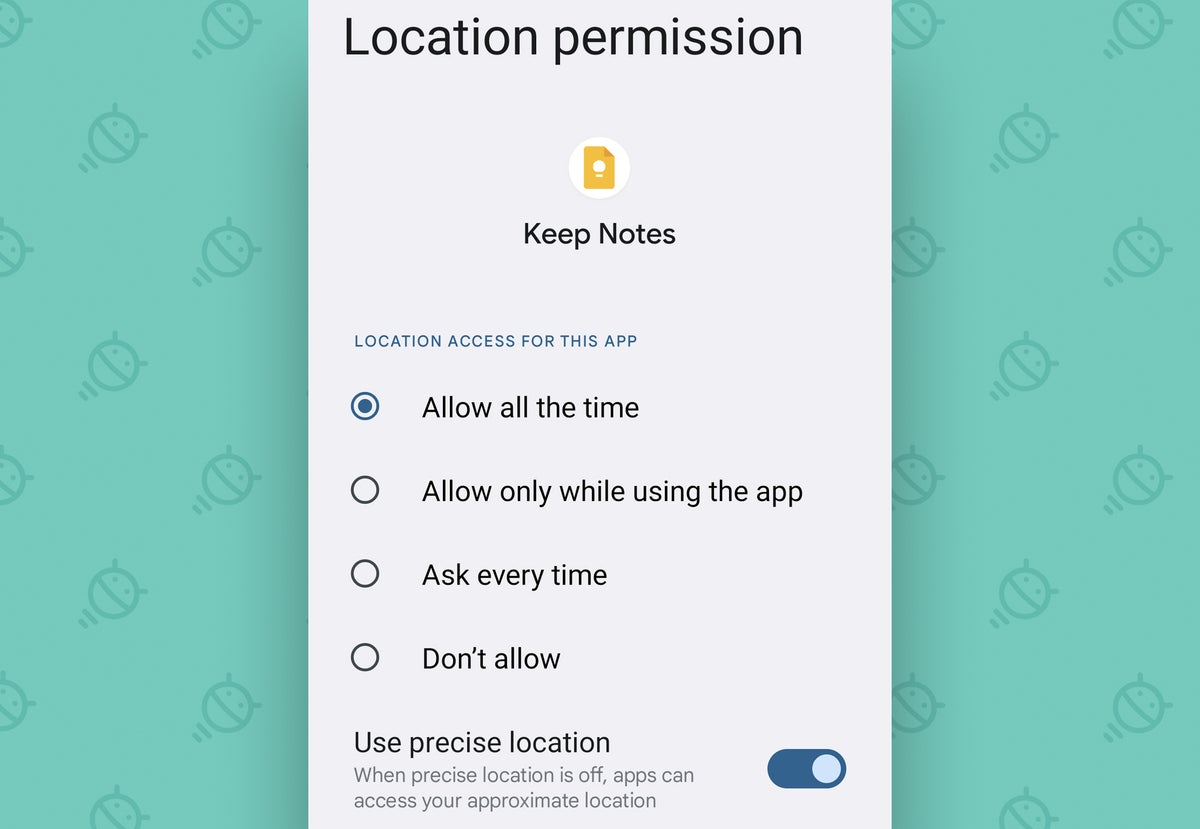
Specifically, you can now let apps access your location only when they’re actively in use, instead of all the time (as of Android 10); you can approve certain permissions only on a one-time, limited-use basis (as of Android 11); and you can determine how detailed of a view any given app gets of your location when you grant it that access (as of Android 12). But any apps that were already on your phone by the time those upgrades arrived would’ve already had full, unrestricted access to those areas of your device. And it’s up to you to revisit ’em and update their settings as needed.
So do this: Head into the Privacy section of your Android settings and find the “Permission manager” line. That’ll show you a list of all available system permissions, including especially sensitive areas such as location, camera, and microphone — the same three areas, incidentally, that can be limited to one-time use only on any phone running at least Android 11. (And if you don’t see a “Permission manager” option on your phone, try looking in the Apps section instead. You can then pull up one app at a time there and find its permissions that way.)
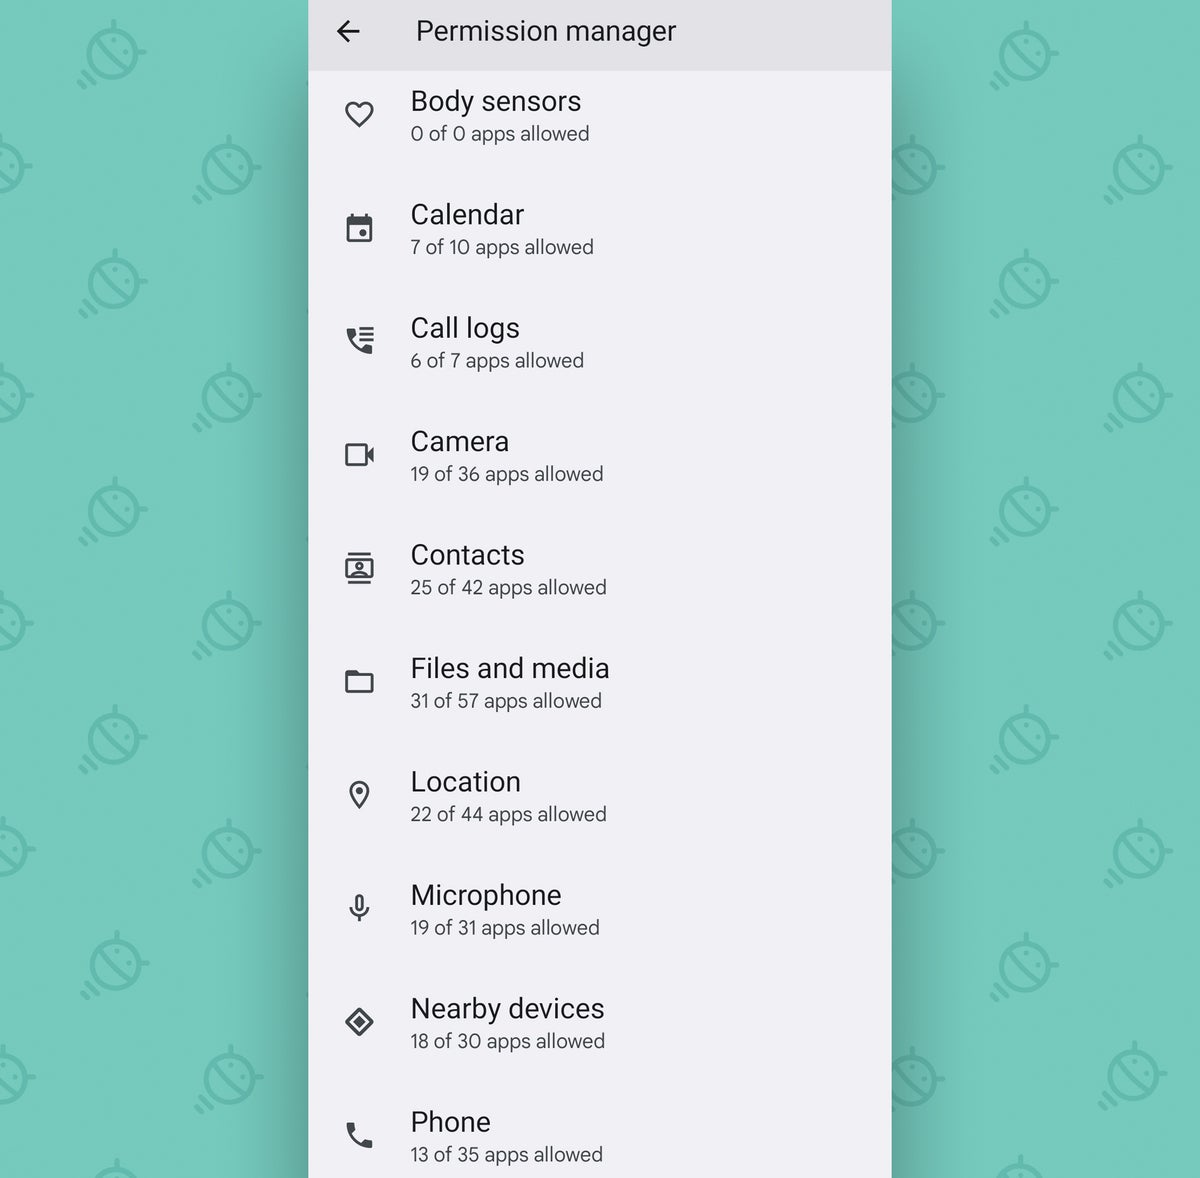
Tap on a specific permission, and you’ll see a breakdown of exactly which apps are authorized to use it in what way.
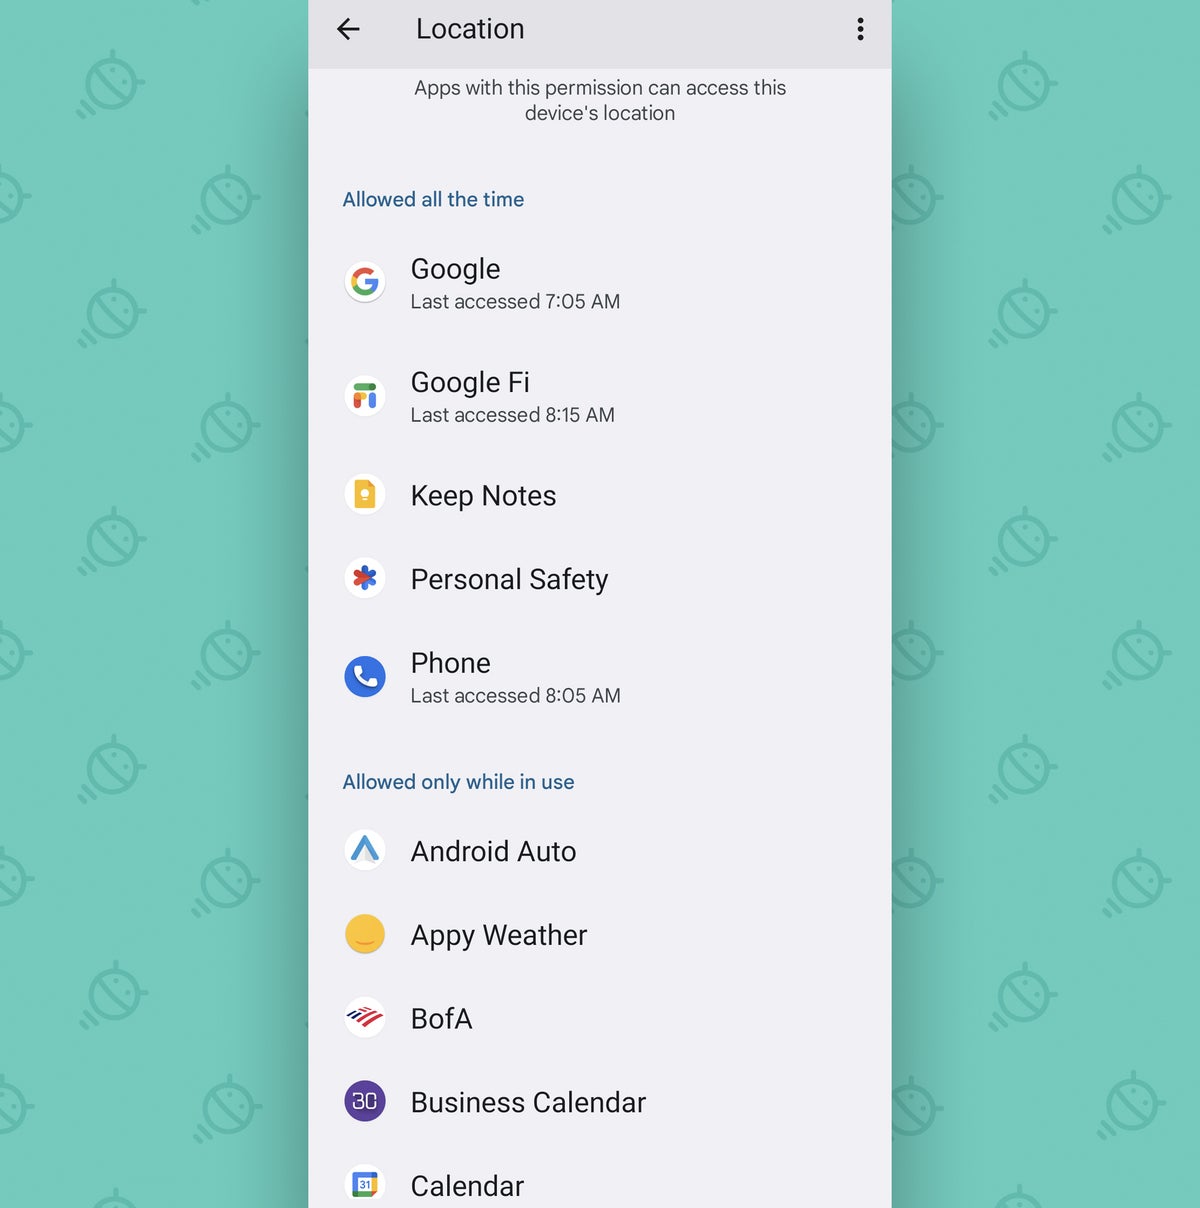
You can then tap on any app to adjust its level of access and bring it down a notch, when applicable, or remove its access to the permission entirely — and, if you’ve got Android 12 or higher, also select whether the app should get access to your precise location or only a far less specific approximate view of where you are.
If there’s one section of your Android settings worth spending the time to revisit, this is without a doubt it.
ANDROID SETTING NO. 2: PLAY PROTECT
Speaking of apps on your phone, this is a fine time to talk about Google Play Protect — Android’s native security system that, among other things, continuously scans your phone for any signs of misbehaving apps and warns you if anything suspicious emerges.
(And yes, it does sometimes fail to detect shady players immediately — something that gets played up to a comedic degree in those misleading marketing campaigns — but even in those instances, the real-world threat to most folks is typically quite minimal.)
Unless you (or someone else) inadvertently disabled it at some point, Play Protect should be up and running on your phone already — but it certainly can’t hurt to double-check and make sure.
To do so, just open up the Security section of your Android settings. Tap the line labeled either “Google Play Protect” or “App security,” then tap the gear icon in the upper-right corner and make sure the toggles there are activated.
Back on the main Play Protect screen, you’ll see a status update showing you that the system is active and running. It works entirely on its own, automatically, but you can always trigger a manual scan of your apps on that same page, if you’re ever so inclined (or maybe just bored).

ANDROID SETTING NO. 3: SAFE BROWSING
Chrome is typically the default Android browser — and as long as you’re using it, you can rest a little easier knowing it’ll warn you anytime you try to open a shady site or download something dangerous.
While Chrome’s Safe Browsing mode is enabled by default, though, the app has a newer and more effective version of the same system called Enhanced Safe Browsing. And it’s up to you to opt in to it.
Here’s how:
- Open up Chrome on your phone.
- Tap the three-dot menu icon in the app’s upper-right corner and select “Settings” from the menu that comes up.
- Tap “Privacy and security,” then select “Safe Browsing.”
- Tap the dot next to “Enhanced protection” on the next screen you see.
While you’re there, back yourself out to the main Chrome settings menu and select “Safety check.” That’ll reveal a handy one-tap tool for scanning your various browser settings and saved passwords and letting you know of anything that needs attention.
ANDROID SETTING NO. 4: LOCK SCREEN INFO
If someone else ever gets their sweaty paws on your phone, you don’t want ’em to be able to access any of your personal and/or company information — right?
Well, take note: Android typically shows notifications on your lock screen by default — which means the contents of emails or other messages you receive might be visible to anyone who looks at your device, even if they can’t unlock it.
If you tend to get sensitive messages or just want to step up your security and privacy game, you can restrict how much notification info is shown on your lock screen by going to the Privacy section of your Android settings, tapping the line labeled “Notifications on lock screen,” and then changing its setting from “Show all notification content” to either “Show sensitive content only when unlocked” (which will filter your notifications and put only those deemed as “not sensitive” onto the lock screen) or “Don’t show notifications at all” (which, as you’d expect, will not show any notifications on your lock screen whatsoever).
If you’re using a Samsung phone, you’ll find those same options within the dedicated Lock Screen section of the system settings — though, unfortunately, with less nuance involved (as Samsung has for no apparent reason removed the “sensitive” notification differentiation from the settings on its version of Android).
And speaking of the lock screen…
ANDROID SETTING NO. 5: LOCK SCREEN CONTROLS
By default, Android makes all of the shortcuts in your phone’s Quick Settings area — y’know, that panel of one-tap tiles that shows up when you swipe down from the top of the screen — available even when the device is locked.
Anything that takes you to another area of the operating system will still require authentication, of course, but the simple on-off tiles can be tapped and toggled by anyone who’s holding the phone.
More often than not, that’s an added convenience. Say you want to flip on your phone’s Bluetooth for a fast connection, for instance, or flash on your flashlight to find that stray cheesy poof that slipped out of your sticky grabbers and fell onto the floor. Being able to do those things with a couple quick taps and without having to unlock your phone can certainly be handy.
At the same time, though, it can also allow someone else to do something like change your phone’s sound settings, disable its Wi-Fi connection, or even put it into airplane mode. And if you’re really aiming for the tightest security available, you probably don’t want that sort of stuff to be possible.
Here’s the good news: If you’ve got a device with a recent Android version, you can take control and turn those controls off in the lock screen environment. With Android 12 and up, march into the Display section of your Android settings and tap “Lock screen.” Turn the toggle next to the “Show device controls” option into the off position, then make a celebratory squawking sound and get yourself a soda.
With Samsung phones, you’ll instead need to head into the Lock Screen section of your settings and tap the line labeled “Secure lock settings.” There, you’ll find an option to “Lock network and security,” which prevents any network-related toggles from being used in that context. (Samsung stripped out the ability to lock down all Quick Settings tiles, unfortunately, but the network-connected are probably the most important in terms of security, anyway.)
ANDROID SETTING NO. 6: SMART LOCK
Security is only useful if you actually use it — and given the extra level of inconvenience it often adds into our lives, it’s all too easy to let our guards down and get lazy after a while.
Android’s Smart Lock feature is designed to counteract that tendency by making security a teensy bit less annoying. It can let you automatically keep your phone unlocked whenever you’re in a trusted place — like your home, your office, or that weird-smelling restaurant where you eat barbeque sandwiches almost disgustingly often — or even when you’re connected to a trusted Bluetooth device, like a smartwatch, some earbuds, or your car’s audio system.
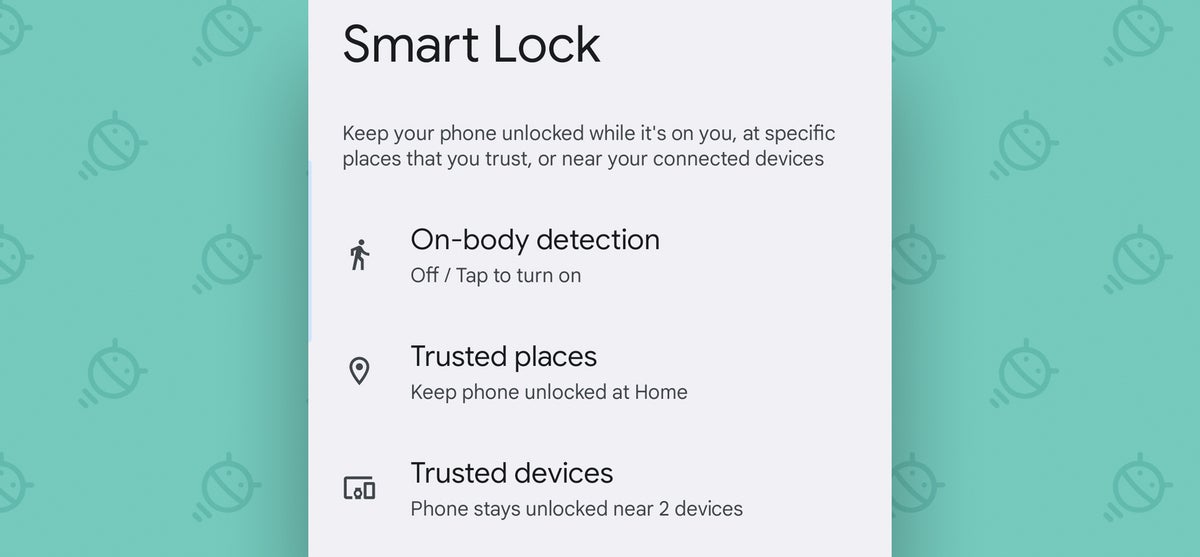
Depending on your device, you’ll want to look for the “Screen Lock” option in the Security section of your Android settings (with older Android versions), look under “Advanced settings” within the Security section (with Android 12), or look in the Lock Screen section of your settings (on a Samsung phone) to explore the possibilities.
And if you ever find the Trusted Places part of Smart Lock isn’t working reliably, by the way, here’s the 60-second fix.
ANDROID SETTING NO. 7: TWO-FACTOR AUTHENTICATION
This next one’s technically a Google account option and not specific to Android, but it’s very much connected to Android and your overall smartphone experience.
You know what two-factor authentication is by now, right? And you’re using it everywhere you can — especially on your Google account, which is probably associated with all sorts of sensitive data? RIGHT?!
If you aren’t, by golly, now’s the time to start. Hustle over to the Google section of your Android settings, tap “Manage your Google Account,” and then scroll across that top row to select the “Security” tab. Find and tap “2-Step Verification” and follow the steps to set things up.
For most people, I’d recommend using your phone’s own “Security Key” option as the default method, if it’s available, followed by “Google prompts” and an authenticator app as secondary methods. For that last part, you’ll need to download and set up an app like Google’s own Authenticator or the more flexible Authy to generate your sign-in codes.
If you really want to take your Google account security to the max, you can also go a step further and purchase a specific standalone hardware key that’ll control the process and be required for any successful sign-in to occur.
It’ll add an extra step into your sign-in process, but this is one area where the minor inconvenience is very much worth the tradeoff for enhanced protection.
ANDROID SETTING NO. 8: LOCKDOWN MODE
Provided you’re using a phone with Android 9 or higher (and if you aren’t, switching over to a current phone that actually gets active software updates should be your top security priority!), an Android setting called lockdown mode is well worth your while to investigate. Once enabled, it gives you an easy way to temporarily lock down your phone from all biometric and Smart Lock security options — meaning only a pattern, PIN, or password can get a person past your lock screen and into your device.
The idea is that if you were ever in a situation where you thought you might be forced to unlock your phone with your fingerprint or face — be it by some sort of law enforcement agent or just by a regular ol’ hooligan — you could activate the lockdown mode and know your data couldn’t be accessed without your explicit permission. No notifications will ever show up on your lock screen while the mode is active, and that heightened level of protection will remain in place until you manually unlock your phone (even if the device is restarted).
The trick, though, is that on certain phones — particularly those that shipped with earlier Android versions and were upgraded to Android 9 at some point — you have to enable the option ahead of time in order for it to be available. To confirm that it’s activated on your device, open up your Android settings, search for the word lockdown, and make sure the toggle alongside “Show lockdown option” is set to the on position.
If you’re using a current phone and don’t see any results for that search, the option is probably just automatically enabled — and you shouldn’t have to do anything to make it available.
Either way, once the system’s up and running, you should see a command labeled either “Lockdown” or “Lockdown mode” anytime you press and hold your phone’s power button. With any luck, you’ll never need it. But it’s a good added layer of protection to have available, just in case — and now you know how to find it.
ANDROID SETTING NO. 9: APP PINNING
One of Android’s most practical settings is also one of its most hidden. I’m talkin’ about app pinning — something introduced way back in 2014’s Lollipop era and rarely mentioned since.
App pinning makes it possible for you to lock a single app or process to your phone and then require a password or fingerprint authentication before anything else can be accessed. It can be invaluable when you pass your phone off to a friend or colleague and want to be sure they don’t accidentally (or maybe not so accidentally) get into something they shouldn’t.
To use app pinning, you’ll first need to activate it by opening that trusty ol’ Security section in your Android settings and then finding the line labeled “App pinning,” “Screen pinning,” or possibly “Pin windows.” (You’ll probably have to tap a line labeled “Advanced settings” or “Other security settings” to reveal it.) Tap those words, whatever they are on your specific device, then turn the feature on and also make sure the toggle to “Ask for unlock pattern before unpinning” is activated.
Then, the next time you’re about to place your phone in someone else’s grubby hands, first open up your system Overview interface — either by swiping up from the bottom of your screen and holding your finger down, if you’re using Android’s gesture system, or by pressing the square-shaped button, if you’re still hanging onto the old-school three-button nav setup.
On any phone running reasonably recent software, you’ll then tap the icon of the app you want to pin, directly above its card in that Overview area. And there, you should see the Pin option.
Once you’ve tapped that, you won’t be able to switch apps, go back to your home screen, look at notifications, or do anything else until you exit the pinning and unlock the device. To do that, with gestures, you’ll swipe up from the bottom of your screen and hold your finger down — and with the old three-button nav setup, you’ll press the Back and Overview buttons at the same time.
ANDROID SETTING NO. 10: GUEST MODE
If you want to go a step further and let someone else use all parts of your phone without ever encountering your personal information or being able to mess anything up, Android has an incredible system that’ll let you do just that — with next to no ongoing effort involved.
It’s called Guest Mode, and it’s been around since 2014, despite the fact that most folks have completely forgotten about it. For a detailed walkthrough of what it’s all about and how you can put it to use, see my separate Android Guest Mode guide.
Just note that if you have a Samsung phone, that guide won’t do you much good — as Samsung has for no apparent reason opted to remove this standard operating system element from its software (insert tangentially related soapbox rant here). On Google’s own Pixel phones and many other Android devices, though, it’ll take you all of 20 seconds to set up and get ready.
ANDROID SETTING NO. 11: FIND MY DEVICE
Whether you’ve simply misplaced your phone around the house or office or you’ve actually lost it out in the wild, always remember that Android has its own built-in mechanism for finding, ringing, locking, and even erasing a device from afar.
Like Play Protect, the Android Find My Device feature should be enabled by default. You can make sure by heading into the Security section of your Android settings and tapping the line labeled “Find My Device.” Double-check that the toggle at the top of the screen is turned on.
Using a Samsung phone? Samsung provides its own superfluous, redundant service called Find My Mobile, but the native Google Android version will bring all of your devices — not only those made by Samsung — together into a single place. and it’s also much more versatile in how and where it’s able to work. On a Samsung device, the easiest way to find the Android Find My Device setting is to search your system settings for the phrase Find My Device.
Once you’ve confirmed the setting is enabled, if you ever need to track your phone down, just go to android.com/find from any browser or do a Google search for “find my device.” (There’s also an official Find My Device Android app, if you have another Android device and want to keep that function standing by and ready.)
As long as you’re able to sign into your Google account, you’ll be able to pinpoint your phone’s last known location on a map and manage it remotely within a matter of seconds.
ANDROID SETTING NO. 12: EMERGENCY CONTACT
Find My Device is a fantastic resource to have — but in certain situations, you might get a missing phone back even faster with the help of a fellow human.
Give people a chance to do the right thing by adding an emergency contact that can be accessed and dialed with a few quick taps from your phone’s lock screen. To start, go to either the About Phone section of your Android settings or the Safety & Emergency section, if you have it, and then find and tap the line labeled either “Emergency information” or “Emergency contacts.”
Follow the prompts there to add in an emergency contact — a close friend, family member, significant other, random raccoon, or whatever makes sense for you. (Hey, I’m not here to judge.)

Easy peasy, right? Well, almost: The only challenge is that the emergency contact info isn’t exactly obvious or simple to find on the lock screen — go figure — so anyone who picks up your phone might not even notice it.
But wait! You can increase the odds considerably with one extra step: Head into the Display section of your settings and tap “Lock screen” (which may be hidden within an “Advanced” subsection, depending on your device), then tap the line labeled “Add text on lock screen.”
However you get there, once you find yourself facing a blank space for text input, enter something along the lines of: “If you’ve found this phone, please swipe up and then tap ‘Emergency call’ and ‘View emergency information’ to notify me.”
That message will then always show up on your lock screen — and as an added bonus, if there’s ever an actual emergency, you’ll be ready for that, too.
Using a Samsung phone? For no apparent reason (sensing a theme here?), Samsung has removed the direct emergency contact system and instead offers only the ability to place plain text on your lock screen. You can find that, though, by making your way into the Lock Screen section of your system settings and looking for the line labeled “Contact information” — and there, you can just type in your emergency contact info directly and hope that someone finds it and then dials it from their own phone.
ONE MORE THING…
Now that you’ve got your Android security settings optimized and in order, take 10 minutes to perform an Android security checkup. It’s a 16-step process I’ve created for the state of security on both your phone and your broader Google account — and it’s well worth doing at least once a year.
The best part of this checkup? It’s completely painless — and unlike with most preventative exams, removing your pants is entirely optional.
For enquiries, product placements, sponsorships, and collaborations, connect with us at [email protected]. We'd love to hear from you!
Our humans need coffee too! Your support is highly appreciated, thank you!
